Monday, 8 January 2018

Animate CC -flappyBird -Part1


Flappy Bird 

Animate (Flash) CC HTML5 Tutorial

Part 1

– based on-


·      Create the ground, the pipes, and the crash screen

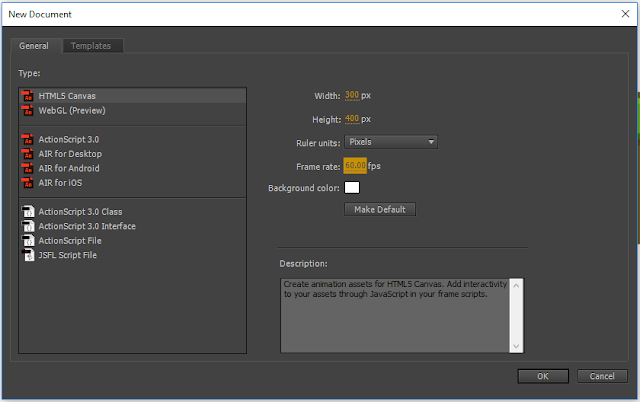
Note: HTML5 Canvas -Width 300 -Height 400 -Frame rate 60 fps
1.  Create the Ground
Create New Symbol (ctrl F8): ground – movie clip
While editing the movie clip:
Create Layer: grass light
Draw empty black box – set size to 193, 8    position (0, 4)
Zoom in (z)
Choose anchor point tool (=)– set points varying distances along the bottom of the box
Switch to selection tool (v) then pull the different sections down to form bumps

Fill it green 72BE32 and remove the outline -LOCK
Duplicate Grass Light Layer: Grass Medium
UNLOCK – paint 4B841D (0, 6) – LOCK – drag layer below Grass Light
Duplicate Grass Light Layer: Grass Dark
UNLOCK – paint 665025   (0, 8) – LOCK – drag layer below Grass Medium
Create Layer: Dirt Dark
Rectangle – 193x50 (0, 0) – brown 7B6233  - LOCK
Duplicate Dirt Dark layer: Dirt Light
UNLOCK – paint 85D93D      Size 193x2 (0, 2)

Drag dirt dark and dirt light below grass layers
add your blog address above Dirt Dark
 – LOCK all Layers

Click on Scene 1 to exit ground symbol editing

2.  Create the Pipes
Create New Symbol (ctrl F8) : Pipes – movie clip
Rename Layer1 : Pipe Bottom
Draw a rectangle – no edge – any colour set size to 48x179 position (6, 24)
Apply a linear gradient (menu: window – color) left size 59C900 – right side 459E00 - then add to swatches – use the paint bucket to apply the gradient to the pipe bottom

LOCK & HIDE – Pipe Bottom layer
Create a new layer: Pipe Top
Using the same linear gradient swatch – select rectangle tool and set the Rectangle Option edges to radius 3
Draw a rectangle 60x27 (0, 0) – radius 3 –
LOCK & HIDE both layers
Create a new layer: Shadow Bottom – move layer to just above Pipe Bottom layer
Draw a rectangle  - no edge – 377E00 – 40% alpha – radius 0  48x11  (6, 25)
Choose Modify – Transform – Distort then drag the bottom left corner straight upwards by about half the distance - LOCK

Create a new Layer at the very top: Shadow Top
choose rectangle tool – unlock corner radiuses then set top left and top right to radius 3 – bottom left and bottom right to 0
Draw a rectangle 60x3 (0, 0)

Create a new layer at the very top: Highlight
Draw a line 6BDB12– stroke 5 -height 12 (6, 8)
Draw another line height 166 (13, 33)
LOCK all layers – UNHIDE all layers


3.  Crash Screen Flash
Create new symbol (CTRL F8) : Screen Flash – movie clip
Draw a white rectangle FFFFFF NOTE: Alpha 100% and radius 0
You will not be able to see it with the white background. Drag the selection tool over it.
Then set these values: 300x400 (-150, -200) 


...it's just a white rectangle - go to part 2

Tuesday, 19 December 2017

Animate -BONE tool -GingerBread Man

Animate a Ginger Bread Man 
using 
ANIMATE CC and the BONE TOOL

based on: LINK


Create an 800 x 800 ActionScript 3.0 document
Add the gingerbread man – FILE – import - import to stage
Break it apart – CTRL-B
Use the Lasso Tool to surround the parts
Make movie clip symbols (F8) out of its: rightArm – leftArm – rightLeg – leftLeg - body
If necessary - edit each movie clip to delete erroneous background – use the Magic Wand tool
Also – round out the severed ends with the Eraser Tool
For each limb:
Enable the free transform tool – adjust the pivot point (WHITE CIRCLE) to where the body would connect to the limb. Then make the limb and body over-lap a little
Bone Tool:
Select all the parts together (Selection Tool). Choose the Bone Tool – then click and drag from the center out to each limb pivot point. The symbols are now connected and will animate together.
Go To 70 on the time line and add a frame (F5) on Layer 1 and the NEW Armature_1 layer
While on the Armature_1 layer – choose one of the bone line connections  - in the properties panel – uncheck the enable box under Joint:Rotation (make sure this is unchecked for each connection)


Add a background layer

Add a keyframe (F6) to frame 10 of the Armature_1 layer.
Adjust the GingerBreadMan to begin a jump and continue with 20 40 50 – 60 may be just a copy of 1.

Add a blog address layer.

FILE – export – export Animated Gif


Make as second animation – WALKING - across the scene

  • replace 1 limb - make the new symbol first - right click on the symbol you wish to replace - choose 'swap symbol'


Make a third animation – FALLING

  • replace all the limbs


KhanAcademy - Hour of Code


List of Assignments

watch - Intro to Drawing

1. Do - Challenge: H for Hopper

DRAW HI


Watch - More Drawing!

2. Do - Challenge: Funny Face

-add unibrow - lips - pupils - 1 ear and earring  - using only multiples of 5


Watch - Intro to Coloring


3. Do - Challenge: It's a Beautiful Day

- Change shape of cloud - position of sun - add eggs with 3 spots


4. Do - Project: Wild animal


Draw a Framed Picture of a Pirate


with eye patch - belt and buckle and a sword


Friday, 15 December 2017

Game Journalism Day 5 - WALK THROUGH

Game Journalism Day 5

Walk Through and Game Guide


Explain how to play this game. From the moment you wake up to a far as you ever traveled.

Add screen shots of key land marks.

Thursday, 14 December 2017

Game Journalism Day 4 - FAIL

Game Journalism Day 4


Video Day
7 videos

Wolf - Bear - Fire - Fall - Thirst - Hunger - Hypothermia -Drowning  - infection (animal bite) - Dysentery (dirty water)

Challenge FAILED


Video all the ways to FAIL the challenge.


fail by WOLF

fail by FALL

fail by HYPOTHERMIA


fail by FIRE

fail by BEAR


Load the fraps movie into WINDOWS MOVIE MAKER
cut out the erroneous parts
add a title
add URL as credits
.... save movie - for EMAIL


Wednesday, 13 December 2017

Game Journalism Day 3 - TACKLE

Game Journalism Day 3


Question 1: How many days to do you have to complete the challenge?

SHOW your USERS how TO...do something usefulTask 1:

What does it take to make fishing tackle?

screen shots

Make some fishing tackle.

screen shots

Go to an ice fishing hut and fish


screen shot


ice fishing hole


Question 2: What did you do today?

Outline the steps you took to make fishing tackle and to go fishing
Where did you go and how did you survive to complete the task? 
Details are important. Screen shots help too.

Tuesday, 12 December 2017

Game Journalism Day 2 - SURVIVE


Game Journalism Day 2


Question 1: What is the challenge?

write it out... 
Screen shot: water (potable)


Screen shot: Hunter's Blind or another shelter other than the main cabin


hunter's blind
ice fishing hut

lodge on lake


Screen Shot: corpse


Question 2: What did you do today?

Outline the steps you took to survive.
Where did you go and what did you accomplish? Details are important. Screen shots help too.

Question 3: What survival tip do you have?

Tips and tricks

Exit Interview

Exit Interview You have reached the end of the course.  Some assignments you may have enjoyed while others ... Question 1: Which assig...