Flappy Bird Animate CC HTML5 Tutorial
Part 2
– based on-
Create the Bird
Create a New Symbol (ctrl F8) : Bird – movie clip
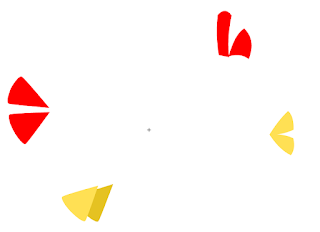
The Bird’s Feet
While editing the Bird movie clip – rename layer 1 : Feet
Choose the Line (n) tool – set the stroke to 1 and colour to (E5C222)
Draw a diagonal line like this / then highlight it and change a few values
Stroke 10 – Brush Library – Line Art – Basic – Flame Left
Position 8.85 x 8.45 (-19.55,16.20)
Now lighten the colour to (FFE054) and draw a second foot
8.2 x 7.8 (-23.35,16.65) – LOCK the layer
The Bird’s Tail
Create a new layer: Tail
Line tool (FF0000) Flame left tool and stroke :10 – using flame left brush
Draw a line like this \ 11.40 x 6.00 (-41.15,-12.60)
Draw another line below like this / 10.75 x 5.75 (-40.35, -5.35)
Lock the layer
The Bird’s Crest
Create a new layer Crest
Choose line tool – straight line- stroke 1 (000000) black
Draw them – use the selection tool to bend the lines – break apart (ctrl-b)- paint them (FF0000) – remove outlines –
Group them (ctrl-g) – 10.35 x 14.45 (20.25,-35.60) -LOCK layer
The Bird’s Beak
Create a new layer: Beak
Choose the line tool – straight line – stroke 1 -black
Draw a beak – bend the lines – break apart- paint (FFE054) yellow –remove lines – group up
7.40 x 13.20 (35.9,-5.65) – lock layer
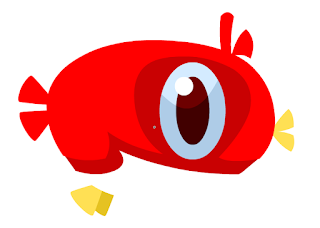
The Bird’s Body
Create a new layer: Body
Draw an OVAL – black - stroke 1 - no fill
Then stretch it with the selection tool - through the tips of the tail, feet, beak and crest
Use the line tool - draw some feather structure that goes around a giant eye.
Highlight all – group – then break apart
Paint outside and above the eye area (FF0000) dark red. The eye area (C90102) bright red and the breast (FFFFFF) white.
Remove the black lines – LOCK the layer
The Bird’s Eye
Create a new layer: Eye
Use the OVAL tool with NO FILL – draw a tall oval – then a line crossing the top 1/3 – bend the line down
Draw the pupil then a small circle at the top left of the pupil.
Colouring – lower half of pupil (410000) – upper half of pupil (6D0000)
Upper half of eye (D4EBFF) – lower half of eye (AECCE7)
The small circle (FFFFFF)
If you change the document stage (ctrl-j) to grey the breast colour shows up nicely.
Choose Modify – document – stage color
The Bird’s Wing
On frame 16 of each layer add a new frame (F5)
Create a new layer: Wing
Draw a feather that makes up part of the wing. Flame Left Brush – stroke 10 – (C90101)
Draw a vertical line and bend it left slightly. 9.3 x 33.75 (-18.35,-40.6)
Copy and paste the first feather – use the transform tool – move and turn the feather until tips touch but the top 1/3 does not.
Copy and paste the second feather – use the transform tool – move and turn the feather until tips touch but the top 1/3 does not.
On frame 2 – add a new keyframe (F6) – delete feather 1 (2 left)
On frame 3 – add a new keyframe (F6) – delete feather 2 (1 left)
On frame 4 – add a new keyframe (F6) – delete feather 3 (no feathers)
On frame 5 – add a new keyframe (F6) – copy feather from frame 3 paste in place in frame 5 (SHIFT-CTRL-V) – choose transform tool – move white dot to tip – turn feather to point left. (1 feather)
On frame 6 – add a new keyframe (F6) – choose transform tool – turn feather slightly downward.
On frame 7 – add a new keyframe (F6) – copy feather – paste-in-place (Shift-ctrl-v) choose transform tool – turn feather downward.
On frame 8 – add a new keyframe (F6) – copy second feather – paste-in-place (Shift-ctrl-v) choose transform tool – turn straight down.
You should have 3 feathers now pointing downward.
On frame 9 – add a new keyframe (F6) – delete third feather
On frame 10 – add a new keyframe (F6) – delete second feather
On frame 11 – add a new keyframe (F6) – delete first feather
Copy FRAME 5 paste onto frame 12
On frame 13 – add a Blank keyframe (F7)
Copy FRAME 3 paste onto frame 14
Copy FRAME 2 paste onto frame 15
Copy FRAME 1 paste onto frame 16
Click on Loop (Shift-Alt-L) stretch to fit all 16 frame then click the play button to test.
Adding Collision Points
Create a new layer: Collision Points
Create a blue 4x4 NO EDGE circle. Turn it into a movie clip: Collision Point
Rename this first blue movie clip’s instance name: hit0 and place it at the top of the crest.
Place 8 more around the bird: hit1 through hit8 -LOCK
Create a new layer: Script
Add a new blank keyframe on the Script timeline at 16 (F7)
Add actions (F9) type in: this.gotoAndPlay(1);
LOCK
Code added later will test these collision points against the pipes. It will also hide them.
Draw the Background
Rename Layer 1: Background
First create a linear gradient from light blue to white
Window-color-linear gradient-double click the left marker and change it to light blue.
Draw a box –no edge – turn it into a graphic symbol:sky - DELETE
Draw a series of circles from the left side to the right side – make into graphic symbols
(Or use the first one and paint each these different colours) – then make new symbol
(1CD241):green (5BE7AB):Light Green (B6FFFC):Pale Blue (ECF8FF):Off White (CDEEFF): baby Blue
Now organize all the pieces –in the order you made them from bottom to top with the sky in the background- use right –click – arrange send backward to help
Sky - Use the transform tool to spin it light blue at the top 300 x 400 (150,200)
Highlight all together and turn into a movie clip:Background
In the properties inspector choose RENDER: Cache as Bitmap – it is a performance booster.
LOCK the background layer
Adding the Pipes
Create a new layer: Pipes
Duplicate the Pipes movie clip: Standing Pipe
Insert a new movie clip symbol: gap pipes – drag in an instance of the standing pipe movie clip then turn it upside down place it near top. Drag a second instance below the first.
Top pipe (57,-49) 60,203 Bottom pipe (group up) (-3,49) 60,203
Drag an instance of the gap pipes movie clip off the left of the stage – instance name: pipe0 (-57,100)
Second instance of the gap pipes movie clip to the middle of the stage – instance name: pipe1 (123,200)
third instance of the gap pipes movie clip off the right of the stage – instance name: pipe2 (303,250)
Code will use the instance names. The left and right pipe heights represent the highest and lowest pipe positions during the game. They move left to right.
LOCK
Adding the Ground
Create a new layer: Ground
Drag three instances of the ground onto the stage
Instance name: ground0 (0,351) - render field: cache as Bitmap
Instance name: ground1 (187,351) - render field: cache as Bitmap
Instance name: ground2 (374,351) - render field: cache as Bitmap
Code moves them right to left.
LOCK the layer
I created a folder in the library called Background Items and placed the background items into it.
Adding the Flappy Bird
Create a new layer: Bird
Drar an instance of the bird onto the stage. Instance name: bird (94,175)
Lock the width and height values together then set the bird’s width to 33
LOCK
Adding the User Interface Elements
Create a new Layer FOLDER: UI
Create 4 new layers: Start Instructions, Get Ready, Game Over, Screen Flash
You may have to drag them into the folder. Make sure Screen flash is on top.
Under Start Instructions type ‘PRESS ANY KEY TO FLAP’ by duplicating the layer and making the bottom layer black
Make into a Movie clip symbol: Start Instructions -Render: Cache as Bitmap
-instance name: startInstructions - place in middle of stage -LOCK
Under Get Ready layer type ‘Get Ready’ larger font than start instructions, add a drop shadow
Make into a movie clip symbol: Get Ready –Render: Cache as Bitmap
–instance name: getReadyPrompt -place top center of stage –LOCK
Under Game Over type “Game Over” in the same font size at get ready, drop shadow
Make into a movie clip symbol: Game Over –Render: Cache as Bitmap
–instance name: gameOverPrompt –place above Get Ready –HIDE -LOCK
Under Screen Flash –drag in movie clip screen flash – (150,200)
Instance name: screenFlash –HIDE –LOCK
I created a folder in the library also called UI and placed the 4 new symbols into it.
Adding the Score Text Field
An extra layer needs to be added to the UI folder
Create a new layer: Score and drag it into the UI folder BELOW the Screen Flash layer.
Choose the TYPE tool set the properties to
Dynamic Text (under instance name: score)
Family: Arial Rounded MT Bold Size: 30 Color: white
Under ‘paragraph’ format: centered
filters: glow –black -10px
LOCK
TEMPORARILY
To test how things are looking to date. Right click on the Screen Flash layer –choose Properties and select: GUIDE
Now to run the game in a browser select CTRL-ENTER
There will be warnings.
Now restore the screen flash layer - Right click on the Screen Flash layer –choose Properties and select: NORMAL


